Essential Tools for DIY Haircuts
Embarking on the journey of DIY haircuts requires the right tools to ensure a successful outcome. Investing in a few essential items can drastically improve the quality of your haircut and reduce the chances of mishaps. Below, we will explore the must-have tools that every DIY hairstylist should consider.
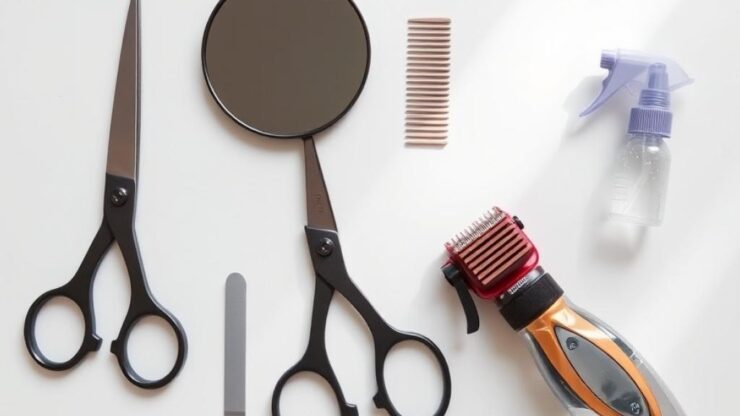
When it comes to haircutting, precision is key. The following tools are essential for achieving clean and professional-looking results:
- Hair Cutting Scissors: A good pair of hair cutting scissors is non-negotiable. Look for scissors specifically designed for cutting hair rather than craft scissors.
- Thinning Shears: These are great for texturizing hair and removing bulk without altering the overall length.
- Hair Clipper Set: Ideal for shorter styles, clippers come with various guard lengths that allow for different hair lengths and styles.
- Comb: A sturdy comb helps in sectioning hair and ensuring even cuts.
- Mirror: A dual-sided mirror is essential for visibility, allowing you to see the back of your head while cutting.
In addition to the core tools, there are several accessories that can enhance your DIY haircutting experience:
- Hair Clips: These help in sectioning your hair and keeping it out of the way while you work.
- Cape or Towel: Protect your clothes from hair clippings with a dedicated haircutting cape or an old towel.
- Spray Bottle: A spray bottle filled with water is useful for dampening hair to make cutting easier.
With the right tools and accessories in hand, you can tackle your haircuts at home with confidence. Remember, practice makes perfect, so don’t be discouraged by initial attempts. Happy cutting!
Step-by-Step Guide to Cutting Hair at Home
Before diving into the actual haircut, it’s crucial to lay the groundwork for a successful experience. Start by choosing a well-lit area with a mirror that allows you to see your entire head. Ensure that your tools are clean and easily accessible to avoid disruptions during the process. A comfortable chair can also make a significant difference, as it allows you to maintain the right posture while working. Remember to wear an old shirt or a dedicated haircutting cape to keep hair clippings at bay.
Once you’re prepared, it’s time to start the haircut. Begin by dampening the hair slightly with your spray bottle to make it easier to manage. Section the hair using your comb and hair clips, creating manageable portions that will help maintain uniformity throughout the cut. For those new to cutting hair, it’s advisable to start with small sections and gradually work your way up. This method provides greater control and reduces the likelihood of cutting too much at once.
When it comes to the actual cutting technique, hold the scissors at an angle and cut small amounts of hair, regularly stepping back to assess your progress. If you’re using clippers, select the appropriate guard size for the desired length and move with even strokes, ensuring you don’t miss any areas. For layering or texturizing, consider utilizing thinning shears to blend the hair seamlessly. This step is particularly important for achieving a natural look that doesn’t appear choppy or uneven.
After completing the cut, it’s essential to focus on the finishing touches. Inspect your work in both the front and back using your mirror, making any necessary adjustments to ensure symmetry. A quick run-through with a comb will help identify any uneven spots that might need attention. Once you’re satisfied with the cut, it’s time to clean up. Use a blow dryer or a brush to remove hair clippings from your clothes and workspace.
In conclusion, while DIY haircuts can save you money and time, they also require patience and practice. As you embark on this journey, remember that each attempt will teach you something new. With the right preparation, execution, and finishing techniques, you can achieve salon-quality results from the comfort of your home. Happy cutting!
Tips for Different Hair Types and Styles
When embarking on the adventure of DIY haircuts, it’s crucial to remember that not all hair types are created equal. Each type presents its own unique challenges and opportunities, making it essential to adapt your cutting techniques accordingly. Understanding your hair type will not only enhance your cutting skills but also ensure that the results are flattering and manageable. Here, we delve into tailored techniques for various hair types, ensuring your DIY haircut achieves the desired effect.
For those with curly or textured hair, the key lies in *working with the natural curl pattern*. Start by dampening the hair, as this helps to define curls better and allows for a more accurate cut. It’s advisable to cut hair when it is dry, as this provides a clearer view of how the curls will fall once styled. Use a technique known as the ‘dry cut,’ which involves snipping individual curls to enhance their shape without sacrificing length. Be cautious, as cutting too much can disrupt the curl’s integrity. Regularly stepping back to observe your work is essential to ensure a cohesive look.
Straight and fine hair types benefit significantly from precision cutting. When working with this hair type, *focus on creating layers to add volume and movement*. Begin by sectioning the hair into manageable parts and using sharp hair cutting scissors to create clean lines. A blunt cut can make fine hair appear even thinner, so incorporating soft layers will help achieve a fuller appearance. Moreover, using thinning shears can also aid in removing excess bulk while maintaining length, creating a more dynamic look. Inspect your work frequently in the mirror, especially at the ends, to ensure the hair maintains a healthy and polished finish.
Thick hair can be both a blessing and a challenge. While it provides a luxurious look, it can also be cumbersome to manage. The goal with thick hair is to *remove bulk while preserving length*. Start by sectioning the hair into quadrants to ensure you’re addressing every part evenly. Using a combination of scissors and thinning shears can help in achieving a balanced cut. You might want to consider cutting the hair in a ‘V’ shape to create movement and prevent the weight from dragging it down. Always remember to check for evenness by flipping sections of hair over and assessing the overall shape.
In summary, adapting your haircutting techniques to suit different hair types will not only enhance your DIY skills but also enable you to achieve flattering results without the salon cost. Whether you are working with curls, straight strands, or thick locks, the right approach will ensure a polished and professional finish. With practice and care, your DIY haircuts can become a rewarding and cost-effective alternative to salon visits.
Safety Precautions to Consider
While cutting your hair at home can be an exciting and cost-effective venture, it is imperative to prioritize safety throughout the process. Proper precautions not only protect you from potential injuries but also ensure that your DIY haircut experience remains enjoyable and stress-free. By being aware of the risks and taking the necessary steps to mitigate them, you can confidently wield your scissors or clippers, transforming your look without the need for professional assistance.
Establishing a secure atmosphere in which to perform your haircut is crucial. A clutter-free and organized workspace minimizes distractions and potential hazards. Below are essential safety tips to consider:
- Choose the Right Location: Select a well-lit and spacious area, preferably with a hard surface floor, to make cleanup easier.
- Gather Your Tools: Ensure that all your tools, including scissors, clippers, and combs, are clean and in good condition to prevent accidents.
- Use a Stable Chair: Sit in a chair that provides good support and allows you to maintain a comfortable posture throughout the haircut.
- Wear Protective Clothing: Don a haircutting cape or an old shirt to protect yourself from hair clippings, which can be itchy and uncomfortable.
In addition to creating a safe environment, there are personal safety measures you should adopt while cutting your hair. These practices help avoid injuries and ensure a smooth cutting process:
- Be Mindful of Your Tools: Always handle scissors and clippers with care. Keep blades pointed away from your body to avoid accidental cuts.
- Work Slowly and Deliberately: Rushing can lead to mistakes or injuries. Take your time to ensure each cut is precise and intentional.
- Have a First Aid Kit Handy: Accidents can happen, even with the best precautions. Keep a first aid kit nearby for minor injuries.
By adhering to these safety precautions, you can not only enhance your DIY haircutting experience but also avoid unnecessary risks. Remember, a careful approach yields the best results, allowing you to enjoy the satisfaction of a freshly styled haircut without the salon price tag.
Maintaining Your DIY Haircut Between Sessions
Once you’ve successfully executed your DIY haircut, the next challenge is maintaining its freshness until your next cut. Regular upkeep not only prolongs the life of your haircut but also ensures that your style remains polished and professional-looking. With some simple techniques and products, you can keep your locks in check and looking fabulous without the expense of frequent salon visits.
To maintain your DIY haircut effectively, it’s important to adopt a few essential care practices. These techniques can help you manage your hairstyle, prevent split ends, and retain shape. Below is a comprehensive list of key maintenance strategies that every DIY hairstylist should consider:
- Regular Trims: Schedule small trimming sessions every 4 to 6 weeks to eliminate split ends and maintain the desired length. You can easily do this at home with sharp scissors.
- Proper Washing: Use a sulfate-free shampoo to prevent stripping natural oils. Follow up with a quality conditioner tailored to your hair type to keep it hydrated.
- Styling Products: Incorporate light styling products like mousse or leave-in conditioner to enhance texture and style without weighing down your hair.
- Heat Protection: If you use heat tools, always apply a heat protectant spray to minimize damage and maintain the health of your hair.
- Brush Wisely: Use a wide-toothed comb on wet hair to avoid breakage and a natural bristle brush for dry hair to distribute oils evenly.
Maintaining your DIY haircut is crucial not only for aesthetics but also for the overall health of your hair. Regular upkeep helps prevent issues such as tangling and breakage, allowing you to enjoy the benefits of your haircut longer. Here’s a simple comparison of how maintenance improves the longevity of your haircut:
| Maintenance Activity | Benefits |
|---|---|
| Regular Trims | Prevents split ends and promotes healthy growth. |
| Hydration | Keeps hair moisturized, reducing frizz and breakage. |
| Styling Products | Enhances shape and keeps hair manageable. |
| Heat Protection | Minimizes damage from styling tools. |
By implementing these maintenance tips and strategies, you can easily keep your DIY haircut looking fresh and stylish between sessions. Remember, a little effort goes a long way in preserving your hair’s integrity and your confidence in your appearance.
Disclaimer
This article has been created or edited with the support of artificial intelligence and is for informational purposes only. The information provided should not be considered investment advice. Please seek the support of a professional advisor before making any investment decisions.